
Bulletin Board Community Center Bundles
The Bulletin is a little bit of a hodgepodge grouping of bundles. There is less of a strong theme that you find in other bundles, but that is what makes it more challenging than other bundles. It will often require items that you might expect to have in other bundles, and therefore overlook them.
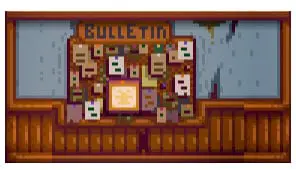
The Bulletin Board in the hallway on the west side of the Community Center, leading to the Vault and the Boiler Room. It will unlock after you have completed three bundles. The bulletin board is stuffed with old posts from the community of Pelican Town. It looks like this:
There are five bundles to complete here, and they’re all fairly involved and widespread. They are the Chef’s Bundle, The Dye Bundle, the Field Research Bundle, Fodder Bundle, and Enchanter’s Bundle.
Chef’s Bundle
While it doesn’t look like it, this is probably supposed to be Gus represented in this bundle. For the Chef’s Bundle, you will need six items:
• Maple Syrup
• Fiddlehead Fern
• Truffle
• Poppy
• Maki Roll
• Fried Egg
Maple Syrup can be obtained by tapping a maple tree AND was already needed in another bundle! So if you’re planning well, you should have this covered! Fiddlehead Fern can only be foraged in the Secret Woods in Summer, so if you want to complete the Community Center in one year, you should focus on opening up the Secret Woods before too much of summer passes. Truffles can only be found by Pigs, and since we covered how you need truffles to produce truffle oil for the Artisan Bundle in the Pantry, you should also have this covered! Poppies are a flower that you can grow in the summer.
A side note, Poppies, if placed near a bee hive, will produce the most valuable honey of the summer season, so it’s well worth it to keep this crop around! Maki Roll can be created by a recipe frm the Queen of the Sauce cooking show (Day 21 of the Summer of Year 1). It requires any fish, seaweed and rice. Conversely, it can be purchased from Gus at the Stardrop Saloon for 1,500g. Fried eggs are also a cooking item and only require an egg to cook.
Your reward for completing the Chef’s Bundle is a set of 3 Pink Cakes . These are a fairly good healing item, healing 250 energy and 112 health. However, it is a popular present for most citizens of Pelican Town, including the notoriously picky Haley. So unless you need it, I would recommend giving these as a gift!
The Dye Bundle
It appears that Emily is the one requesting the items for the dye bundle. Like the Chef’s Bundle, it contains 6 items, all of which are necessary:
• Red Mushrooms
• Sea Urchin
• Sunflower
• Duck Feather
• Aquamarine
• Red Cabbage
Red Mushrooms are fairly common, as we’ve discussed before. They can be found in the mine, in the Secret Wood in Summer or Fall, by tapping a Mushroom Tree, or if you chose the Mushroom option for the Farm Cave. Sea Urchins can be foraged on the beach after the beach bridge is repaired.
This bridge requires 300 wood. You should do this ASAP as those items are fairly good money in the early game. Sunflowers can be grown in the Summer or Fall. Likewise, Red Cabbage is a summer crop, however Pierre only sells them in Year 2 and afterward. In order to complete this bundle in Year 1, you will have to check the Traveling Cart and have good luck! Duck Feathers are randomly and somewhat rarely dropped by ducks. The duck must be happy to drop them, but once they’re happy, it seems to be all luck. Aquamarine drops from Aquamarine nodes in the Mine as well as boxes.
Once you’ve completed this bundle, you’ll receive a Seed Maker as a reward. You will be able to use this to replicate mature fruit into seeds. The average seems to be 2 seeds per mature fruit, though you can obtain 1-4 seeds, as well as a mixed seed if you are unlucky or an ancient seed if you are very lucky.
Field Research Bundle
It appears that Demetrius is the one who has requested the Field Research Bundle. His bundle is mercifully smaller than the others we have covered so far, only requiring four items:
• Purple Mushrooms
• Nautilus Shell
• Chub
• Frozen Geodes
Purple Mushrooms are fairly common in the Mines, as well as the Farm Cave if you chose the Mushroom Option. Also, if you chose the Forest Farm option, they can be foraged on your farm in the Fall. The Nautilus Shell can be foraged on the Beach in the Winter. It’s important to note that this is not the same as the Nautilus Fossil which is much more rare. If you’ve spent any time fishing in the mountain lake or river, you’ve likely caught a chub. They’re everywhere. Always. Frozen Geodes can be found in the “frozen” section of the Mines, from Levels 40 to 79.
The reward here is a recycling machine . This is a pretty useful tool, particularly early in the game, for making junk that you catch from fishing into useful items.
Fodder Bundle
It appears that Marnie is requesting the Fodder Bundle, it’s even smaller than the Field Research Bundle. It also might be the easiest of all the bundles, with a little bit of planning. You only need three items:
• 10 Wheat
• 10 Hay
• 3 Apples
Wheat and Hay are really easy. Wheat is a very cheap Summer and Fall Crop. Hay can be harvested from your farm once you build a Silo and cut grass with your scythe, but you will need to withdraw the hay from your hay hopper in either the Coop or the Barn. Or, you can take the easy route and buy it from Marnie (it is not expensive).
Apple trees, on the other hand, are pretty expensive. They can be purchased at Pierre’s General Store for 4,000g (or, on occasion from the Traveling Cart for 3,000g to 5,000g). They take 28 days to reach maturity and will produce one fruit per day in the fall. You can also find apples on the Traveling Cart occasionally, but they are also relatively expensive, costing 300g to 1,000g.
The reward for this bundle is a Heater that can go in either your Barn or Coop. These are good for helping keep your farm animals happy. Given that Marnie sells them for 2,000g each, getting one for free is pretty great!
The Enchanter’s Bundle
The final bundle here is the Enchanter’s Bundle. It seems that this requested by the Wizard. Most of the items here are fairly straightforward. You will need to collect all of the following:
• Oak Resin
• Wine
• Rabbit’s Foot
• Pomegranate
Oak Resin, we’ve covered earlier – no big deal! Wine is made by putting fruit in a keg. It’s a useful source of extra money, so you should have more than a few kegs on your farm! Pomegranate can be found in the Farm Cave if you chose the Fruit Bat option, or you can grow a pomegranate tree from a sapling and harvest the trees in the fall. Like Apple trees, these are costly, but last forever, so it’s has a decent ROI if purchased early in-game.
Now, let’s talk about the Rabbit’s Foot. F*** the Rabbit’s Foot. I lucked into one early, but I must stress luck. Unless you’re at the Skull Cavern, these are only dropped by Rabbits. Similar to Duck Feathers and other animal products, this relies on overall happiness and mood of the animal as well as your luck. So good luck! There is also a very rare chance that this could appear in the Traveling Cart.
If you’ve completed this bundle, you will receive 5 gold bars as a reward. If you haven’t already completed the Blacksmith’s Bundle for the Boiler Room Bundle Set, you can use one of these Gold Bars for that Bundle.
Once you complete all the bundles for the Bulletin Board, you will see that it is now repaired and much more organized!
Not only that, but you will now also be granted two extra friendship hearts with all non-romanceable citizens of Pelican Town that you have already met. If you haven’t met a person, such as Kent who arrives in Year 2, your friendship with them will be unaffected and once you meet them, you will have zero hearts. So, if you haven’t already, go say “Hi!” and meet your neighbors before you complete this bundle.
Boiler Room Mining Bundles
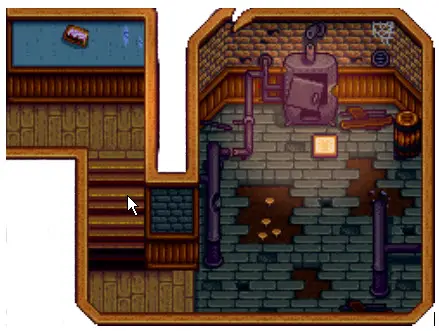
The Boiler Room bundles will become available to you after completing two bundles. The Boiler Room is in the most Western room in the Community Center. It’s pretty dilapidated and broken down when you first encounter it, looking like this:
Like all the other rooms, there is a general theme to this group of bundles, and that theme is mining. Every one of these bundles revolves around mining in some form or another.
Blacksmith’s Bundle
The first bundle is the Blacksmith’s Bundle. All the bundles in the Boiler Room tend to be smaller, and the Blacksmith’s bundle is no exception. You only need three items for the Blacksmith’s Bundle:
• Copper Bar
• Iron Bar
• Gold Bar
If you are active in delving into the Mines and continually exploring deeper (new elevator entrances show up every five floors), this should be a relatively easy Bundle for you to complete. It is important that you have at least one furnace crafted somewhere on your farm.
However, if you are struggling with getting deeper in the Mine, you can also use the Transmute Skill, which will allow you to turn Change 3 Copper Bars to a single Iron Bar at Mining Level 4 and 2 Iron Bars into a single Gold Bar at Mining Level 7.
So, while it would be incredibly inefficient, it’s technically possible to complete this bundle without venturing into lower levels of the cave. However, it would be difficult to complete some other Community Center bundles, so your best bet is to continue to Level up your mining and combat skills, improve your gear, bring food, and push forward!
This bundle will reward you with an additional furnace, which will definitely come in handy! As you start to delve deeper into the mines, you will get increasingly more of different types of ore. It’s very useful to have more than one furnace going at once to help process that ore into useful materials.
Geologist Bundle
While the Blacksmith’s Bundle focused on the ore that is produced in mining, this bundle focuses more on the gems that can be found in the Mine. This is the biggest bundle of the Boiler Room, but only requires four items:
• Quartz
• Earth Crystal
• Frozen Tear
• Fire Quartz
Quartz are the most readily found gem found in the Mines, available by random chance on all levels of the Mines. Earth Crystals are found on the first few levels of the Mines, available by random chance on Levels 1-39. Additionally, they can be found in geodes and can be dropped by Duggies, though they are only found on Floors 1-29. Frozen Tears are available on the next grouping of levels, found between Level 40 and 79.
They can also be found in Frozen Geodes and Dust Sprites, which are found between Levels 40-80. Fire Quartz is also found near the bottom of the Mines, between Levels 80 and 120. They will spawn by random chance on the ground, like the other Gems. They can also be obtained from Magma Geodes and Omni Geodes.
Speaking of Omni Geodes, the reward for completing this bundle is a set of 5 Omni Geodes. These are similar to other geodes but have a fairly good chance to produce valuable goods!
Adventurer’s Bundle
The Adventurer’s Bundle consists of loot that drops from monsters that are found in the Mines. While this Bundle has four possible inputs, it only requires you to donate 2 of them to the Community Center. These items:
• 99 Slimes
• 10 Bat Wings
• 1 Solar Essence
• 1 Void Essence
While you will be able to find slimes and bats in the earlier levels of the mine, it may be more of a time sink to obtain the larger numbers loot dropped for those to be completed. However, you’ve likely spent considerable time in the Mines, so it’s fairly likely you have a large stockpile of Slimes and Bat Wings.
Assuming you haven’t already traveled to the Desert and Skull Cavern, Solar Essences are found on Ghosts, Squid Kids, and Metal Heads, while Void Essences can be found on Shadow Brutes in the Mines.
The reward for completing this bundle is a Small Magnet Ring! This is a pretty cool reward, as it will increase the area around you which automatically sucks goodies into you.
Once you’ve completed all three smaller bundles, you will be treated to seeing the Boiler Room in its repaired state.
Once this system is repaired, you will be able to fast travel to these places! Very useful, especially for fast traveling to or from Mines (especially if you’re cutting it VERY close to passing out at 2 AM).
Fishing Bundles
Fishing Bundles – The Fish Tank
There is something relaxing about fishing, isn’t there? In real life and in Stardew Valley, there’s something about it that puts you at ease. While, in the game, you are not afforded the same sights and sounds as real life, it is balanced by the notification that the game gives you that you have a “Hit!” and provides an indicator how well you’re doing at reeling that fish in.
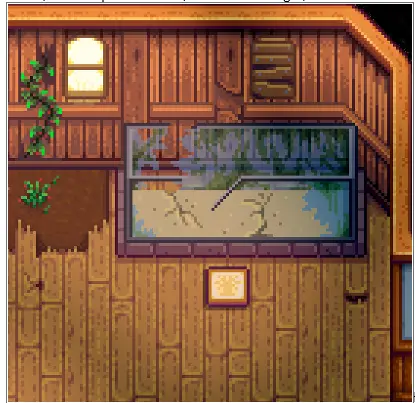
To no one’s surprise, in Stardew Valley, there is also a set of bundles that revolve around fishing. These bundles are grouped by geographic location, rather than season, like the crop bundles. However, time of year, time of day and weather are all major factors that come into play when hunting for specific fish to complete your bundles. Like other bundles for the Community Center, these challenges are required by the Junimos to repair a specific portion of the Community Center – the Fish Tank. These bundles are unlocked after completing one bundle. When you come into the Community Center, it is in the Main Room, at the top of the room, near the back right, and looks like t his:
Ooof, that’s seen better days. Before we go any further, if you’re struggling finding a fish, keep your eyes out for the Traveling Kart. If it appears there, it will likely not come cheap, but it could mean the difference between completing the Community Center in one year or five years (especially at lower fishing skill levels!). Below, we will go over the individual bundles the Junimos require before repairing the Fish Tank.
River Fish Bundle
The River Fish Bundle requires one of each of four different fish that can be found in rivers throughout the area of Pelican Town. Examples of these rivers are the two that run north-south on the East side of town South of the mountain lake and mine, or the river that runs east-west in the southern portion of town and continues west through the Cindersap Forest south of Marnie’s Farm. The fish that are required for this bundle are the following fish:
- Sunfish
- Catfish
- Shad
- Tiger Trout
The Sunfish can be found during the “daytime hours” “of 6 AM to 7 PM on any day in Spring or Summer. Tiger Trout can be found during the same hours but only during the Fall and Winter seasons. The Catfish and Shad can be found at any time but will only come out on days that it is raining. For Catfish, it is in the Spring and Fall (or Summers in the Secret Woods) and for the Shad it is the Spring, Summer and Fall. The reward for this bundle is 30 pieces of bait.
Lake Fish Bundle
The next bundle is the Lake Fish Bundle. Similar to the Lake Fish Bundle, this has four fish that are all required to complete this bundle. These fish are:
- Largemouth Bass
- Carp
- Bullhead
- Sturgeon
The Carp can be caught in any lake, any time, and season (probably one of the easiest fish to catch!). The Bullhead can also be found at any time and any season, but only in the Mountain Lake, near the entrance of the Mine. The Largemouth Bass can also only be found in the Mountain Lake in every season, but only during the “daylight hours.” The Sturgeon can only be found in the Mountain Lake, during the “daylight hours” and only in the Summer and Winter Months. The reward for this bundle is a dressed spinner, which is used to decrease the time before a bite occurs on any line that is currently cast. These will break after a few casts, but it seems to depend and is not a set number of casts before it breaks.
Ocean Fishing Bundle
The third bundle we will focus on is the Ocean Fishing Bundle. As above, this is a set of 4 different fish that can only be fished at the Beach that is south of Pelican Town. These fish are the following:
- Sardine
- Tuna
- Red Snapper
- Tilapia
The Sardine and Tuna are ostensibly the easiest to catch of this group. The Sardine can be caught during the “daylight hours” during the Spring, Fall and Winter. The Tuna can be found during the same hours, but only during the Summer and Winter. The Red Snapper can be found during daylight hours in the Summer and Fall but only on days when it is raining. The Tilapia can be found in the Summer and Fall but only during the hours of 6 AM to 2 PM. The reward for this bundle are 5 Beach Warp totems, which will let you warp from any location directly to the totem that is located at the tree line on the Beach Map. After each use, the totem is consumed.
Night Fishing Bundle
The next bundle is the Night Fishing Bundle. While the other fishing bundles have focused on fish that are predominately found during the daylight hours, these fish can ONLY be found during the evening. There are only three fish in this bundle and they are:
- Walleye
- Bream
- Eel
Bream can be found in any season, from 6 PM to 2 AM in Rivers. Eels can be found in the Ocean from 4 PM to 2 AM in the Spring and Fall and only when it’s raining. Similarly, Walleye can only be found in rain, in Rivers, Lakes and Forest Ponds, from 12 PM to 2 AM. The reward for this bundle is a Small Glow Ring, which emanates a bit of light for a small area around the player and is very useful at later hours and in some levels of the mine.
Crab Pot Bundle
Ugh. This bundle is a real pain. The bad news? You’ll either have to buy some stuff from the Traveling Cart or craft/buy and bait crab pot with religious fervor (and pray for luck). The good news? The list is pretty long, with 10 possible options, and you only need 5. And 4 of those can be foraged on the beach! The whole list is:
- Lobster
- Crayfish
- Crab
- Cockle
- Mussel
- Shrimp
- Snail
- Periwinkle
- Oyster
- Clam
All of these can be caught in a crab pot (but so can junk!), but the Clam, Oyster, Mussel and Cockle are all fairly common on the Beach as forage items. In addition, you can find crabs being dropped by Rock Crabs or Lava Crabs in the Mine. It is nice that you don’t have to worry about season for this bundle, but it isn’t very easy to find some of these items.
Specialty Fish Bundle
The final bundle needed is the Specialty Fish Bundle. If you know what you’re doing, this bundle isn’t particularly difficult! They all have very specific conditions so you just need to know where to look and when. In addition, there are only four fish that you need to find to complete this bundle:
- Pufferfish
- Ghostfish
- Sandfish
- Woodskip
The Woodskip can only be found in the Secret Woods but can be found at any time in any season. In order to catch the Sandfish, you must have access to the Bus, as it can only be found in the Desert. It can be found in any season from 6 AM to 10 PM, so if you’re trying to complete the Community Center in one year, you can save this for near the end! The Ghostfish can only be found in the Mines. You can either fish in the ponds that are in the Mines or you can – on rare occasion – find them as loot dropped by Ghosts. If fishing, they can be found at any time in any season. Finally, the Pufferfish can be found in the Ocean in Summer, only from Noon to 4 PM. All these fish are fairly common in the Traveling Cart as well, if you’re struggling finding one, you may luck into being able to purchase it. The reward for this bundle is 5 “Dish o’ The Sea” meals. This heals 125 Energy and 56 Health with the added benefit of granting a +3 to Fishing for 5 minutes and 35 seconds.
Once you complete all 6 bundles required for the Junimos to repair the Fish Tank. Once repaired, you will see that the Fish Tank now looks like this!
Additionally, once you go to sleep, you will see that the Junimos have now removed the Glittering Boulder that was immediately to the left of the Mine Entrance and North of the Mountain Lake. If you go up to the area, you be met by Willy, who will grant you a copper pan that you can use to “pan” for various types of ore, gems, minerals or other items that are typically only found mining. The player must be keen-eyed to spot the glittering patches in the water and have the pan in their inventory to take advantage of this. Despite the name, the copper pan cannot be upgraded like other tools.
Pantry Farming Bundles
The Pantry: Farming Bundles
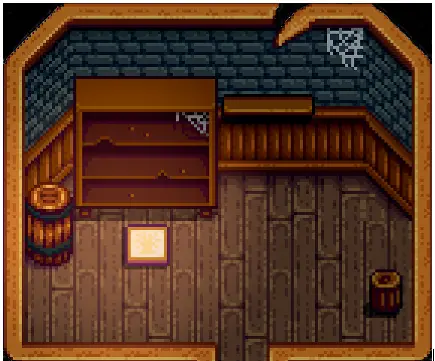
The Pantry Bundle will open after completing one of the Bundles from the Crafts Room. When you first enter this room, you can see that it was a store house of food, and like the Crafts Room, it contains a scroll on the ground. The Pantry initially looks like Unlockthis:
When approached and read, the scroll shows you the Crops and other goods the Junimos would like you to bring to the Community Center in order to receive a prize. Like the Crafts Room, you get small prizes for each individual bundle, as well as one large prize for completing all the bundles for the room. Also, like the Crafts Room, this contains a number of bundles that are specific to each Season.
While these bundles are fairly straightforward, it does require some good planning to achieve all the bundles expeditiously. I would encourage you to peruse all the bundles at the beginning of each season to determine what you can grow that season. If completing the goals of the Community Center bundles is your goal, you should focus your farming efforts on those goals. Some bundles require a significant time commitment, namely some items in the Artisan Bundles. Other require some level of luck for items to spawn, namely those in the Animal Bundle.
That said, let’s take a look at each bundle and focus on the best ways to manage each one.
Spring Bundle
The Spring Bundle contains only normal crops that grow in Spring. These are common crops all with different grow times can be purchased at Pierre’s. They are the following:
- Parsnips
- Green Beans
- Cauliflower
- Potatoes
Worth noting is that you are given 8 packets of Parsnips to help get you started on your farm. Since parsnips grow very quickly, your best bet is to sell those (either ship them or sell them to Pierre for immediate profits) and reinvest into the crops that take longer to grow. Keep in mind, you will need (for a later bundle) a few Gold Quality Parsnips, so don’t ignore them entirely! Also, the Green Beans grow on a lattice which you cannot walk between, so make sure you don’t plant more than 2 consecutive rows, or you’ll waste your money on crops that you can neither water nor harvest.
Your reward for finishing the Spring Crops Bundle is 20 Speed-Gro fertilizer. You will get the recipe for this at Farming Level 3 and you can purchase them for 100g apiece at Pierre’s General Store. It is very useful for planting crops that take considerable amounts of time to reach maturity, increasing growth by 10 percent.
Summer Crops Bundle
The Summer Crops bundle consists of crops that can only be grown during the Summer Season. Like the Spring Bundle, it consists of 4 crops, and they are:
- Tomato
- Hot Pepper
- Blueberries
- Melon
This is a fairly straight forward bundle – you simply need one of every type of crop. The best method to finish this bundle as early as possible is save up your funds from the spring crops and reinvest those profits back into the Summer Seeds as soon as possible. Also, you can start growing corn in the summer, which will continue to produce corn through both the Summer and Fall season. While not needed for the Summer Bundle, it is needed for the Fall Bundle. If you purchase the seeds for corn from Pierre’s, it’s best to buy as early as possible to maximize the return on the money you spent. Like the Spring Bundle, you will need a handful of Gold Quality Melons for a later bundle, so don’t forget to use fertilizer and plant a bunch to ensure that you have enough.
Your reward for this bundle is a Quality Sprinkler. The ability to craft this comes at Farming Level 6 and is fairly resource heavy, requiring an Iron Bar, Gold Bar and Refined Quartz, so getting one for free early is a boon to the Farmer. Since these Sprinklers water the 8 adjacent tiles, in a 3×3 pattern (excluding the middle for the sprinkler), it allows you to focus your efforts elsewhere.
Fall Crops Bundle
Like Spring and Summer before it, the Fall Crops Bundle requires crops that are commonly grown in the Fall Season. These crops are the following:
- Corn
- Eggplants
- Pumpkins
- Yam
As mentioned before, corn can also be grown in the summer, and the plants grown in summer will survive the transition to the Fall. Like all the seasonal crop bundles, this bundle is fairly straightforward. Since there are no crops that grow in the Winter, this will be the final seasonal crop bundle for the year. Also, since they are needed for a later bundle, if you can afford the investment, focus on growing a handful of gold quality Pumpkin, and hold onto as many gold quality corn as you can for the same reason.
Your reward for completion of this bundle is a beehive. If possible, get this bundle as soon as possible to take advantage of the beehive as it produces honey, which is a possible addition to a later bundle. It will need about 4 days to create honey, and does not produce honey in the Winter, but does produce in the Spring, Summer and Fall Seasons. Additionally, if different flowers are placed near the outside of a beehive, it will produce different types of honey. Each of these differential types of honey result in a special variant of honey that is worth more than the standard wild honey.
Quality Crops Bundle
We’ve made a few allusions to this bundle throughout the earlier seasonal bundles. This bundle requires other crops that were needed for the normal seasonal bundles, but you will need 5 Gold Quality of each. There are 4 possible crops that can be used, of which you need three to complete the bundle. These crops are:
- Gold Quality Parsnips (5)
- Gold Quality Melons (5)
- Gold Quality Pumpkins (5)
- Gold Quality Corn (5)
Since the corn grows for two seasons, you are more likely to obtain that earlier or without as much effort as other crops. The best way to ensure the best results in completing this bundle with the least effort possible is to fertilize the soil with either the basic or quality fertilizer prior to planting. The fertilizer will last for an entire season, so it can be used for more of the same crop if needed or for other crops if you’d prefer to grow something else after you’ve achieved your goal. Again, you only need three of the four, so if you plan well, this should be easy to achieve.
The reward for this bundle is a Preserves Jar, which can be used to turn fruit into Jelly or vegetables into Pickles. Both are good for increasing the base value of the fruit (2x+50g the base value for 2-3 days of time), but jelly is also a component of a later bundle, so this is a very useful free item.
Animal Bundle
The Animal Bundle can be a little frustrating. This bundle requires a significant capital investment – In order to fully upgrade your barn and coop you will need 77,000g, 2,550 wood and 1,100 stone (or 124,500g if you buy all the materials from Robin the Carpenter. Not only that, there are a few items that don’t always spawn well, adding a level of uncertainty that isn’t present in a lot of other bundles that require significant time and/or financial investments. There is a list of 6 possible items to use for this bundle, of which you need 5. Those items are the following:
- Large Milk (Cow)
- Large Egg (Brown)
- Large Egg (White)
- Large Goat Milk
- Wool
- Duck Egg
In order to obtain the large versions of these items, your animals – be they chicken, cow or goat – must all be fairly happy and mature. Make sure that they have plenty of hay. You can harvest hay from your farm after building a silo (another hefty investment), you can open your barn/coop doors and let your animals out (just don’t forget to make sure they’re all in before closing the door for the night!), or you can buy Hay from Marnie. Hay can be a tough resource to manage, particularly in the winter when it doesn’t grow. Wool is dropped seemingly randomly by rabbits or can be shorn from Sheep that are in the barn, but only once those sheep reach maturity. If you haven’t figured it out yet, you increase your animals’ happiness by petting them once daily.
Your reward for this bundle is a cheese press which is used to turn milk into cheese and used in the final farming bundle. Not only that, but it’s a great way to increase the value of the milk that your animal produce!
Artisan Bundle
This is the final bundle you will likely have to complete in the farming bundles for the Pantry set. While all the items in this set require considerable time and/or financial investment and/or luck to achieve, you are presented with a number of options. There is a list of 12 possible items that can satisfy the requirements of this bundle, but only 6 are required. Those twelve possibilities are the following items:
- Truffle Oil
- Cloth
- Goat Cheese
- Cheese (Cow)
- Honey
- Jelly
- Apple
- Apricot
- Orange
- Peach
- Pomegranate
- Cherry
If you’ve paid attention, and been careful about completing the other bundles quickly, this final bundle should not be an issue. If you have the animals required for Large Milk or Large Goat Milk and completed the Animal bundle (or crafted a cheese press on your own), you have likely already produced Goat Cheese or Cheese from a cow. If you’ve completed the Quality Crops bundle, you can use the Preserves Jar with fruit to create the Jelly. If you’ve completed the Fall Crops bundle, you can create the Bee House which is used to produce the Honey. If you have a pig, during the non-winter seasons, if you open the door during the day, there is a chance that it will hunt for truffles. If you create an Oil Maker, you can use the truffle with it to create Truffle Oil. If you have a Sheep or rabbits, you can use that wool to create cloth on a wool. Additionally, there is a chance that you can convert soggy newspaper into cloth in a recycling machine.
The other six options are fruit, which are primarily grown on fruit trees. While trees are definitely worthwhile in the long run, they are expensive up-front. Each tree will also require 28 days to grow to maturity before it bears fruit, so if you choose this route, it’s important to try to plan for a season ahead of when you purchase the tree. However, if you choose the Fruit Bat option for the Cave Farm, there is a chance that all these fruits will appear.
The reward for completing this bundle is a keg! It can be used to produce beer, pale ale or wine. Any fruit can be placed in a keg and in a week, it will increase the base value considerably. If you expect that you will try for more expensive late-game items, kegs are a necessity – so it’s very nice to get one for free early on.
Phew! You’ve completed the Farming Bundles for the pantry! After completing all the pantry bundles, the Junimos will repair the pantry, changing its appearance to this:
Additionally, you will find in a cut scene after that day that your Greenhouse has been repaired! We have covered the Greenhouse elsewhere, but it is a very powerful tool for farming both crops and fruit from trees year-round.
